
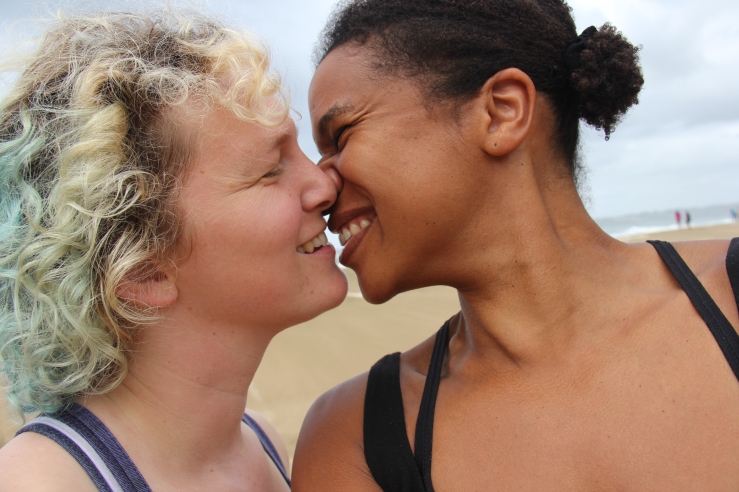
My partner Ariana and I hiked the Kalalau trail on the Na Pali coast of Kaua’i as September became October in 2017. It was many things, including amazingly beautiful and life-threateningly difficult. Many people have hiked this trail and are happy to share about their experiences, but now that I’ve done it, it’s really clear to me that when I hear about how it is for other people, they’re mostly giving me information about how it would be for me if I were them going when they went. Unfortunately, most people whose Kalalau experiences I tried to learn from were very different from me in relevant ways. Like, they were backpackers. Or athletes. Or hiked it when they were nineteen. I’m a woman in my thirties who’s been avoiding sports since I got picked last for kickball in elementary school. I’ve been backpacking, like, half a time. Ariana is also a woman in her thirties, and while she’s more athletic than I am, this was her first backpacking trip ever. We survived, and now that it’s over, I finally have some idea of how to prepare for it. So, if you’re a novice backpacker anything like us, and you’re thinking about hiking the Kalalau trail, I’m writing this for you. Feel free to learn from our experience.
There are a few different ways a hiking trail can be difficult. It can be tiring, like taking hundreds of giant steps up and down giant rocks while carrying a heavy thing on your back. It can be technically challenging, like figuring out the difficult puzzle of where your feet can safely go every step for mile after mile. It can be psychologically challenging, like spending good quality time pondering your own funeral because the possibility of death by misstep has suddenly become very real. It can be annoying, like getting hit in the legs with sticks for hours. It can be suddenly impossible in a way that’s out of your control, like when a storm turns a passable trail into an impassable mudslide. The Kalalau is hard in all of these ways.
Here are some, with tongue firmly in cheek every time I say it, “pro” tips:
Pro-tip #1: Take Your Time
The first smart thing we did was to get a permit for the maximum number of nights (5) and take six whole days to do the thing. Two days to hike in, two days there, and two days to hike out. We imagined this would feel leisurely, since many people hike the whole 11 miles in one day, and some people do the 22-mile round trip as a day hike. (Those people are very very different from me.) It did not feel leisurely. We needed every one of those six days, including the two in the middle to recover before hiking out again. Even if I had somehow been able to hike those 11 miles in a day, I’d still opt for the six-day adventure. Extra time at Kalalau would have been great, not to mention that having the option to wait a day or two to optimize hiking weather could dramatically improve the experience.
Pro-tip #2: Don’t Get Lost
So, weather. By far the biggest uncertain element in our hike was the water falling from the sky and what that would do to the mountain. The first day, we hiked the first six miles and found them to be mostly lovely and and relatively mud-free. On day two a storm turned the mountain into a mudslide, and it was treacherous. We still don’t know when or how we took a wrong turn, but we wound up at the bottom of a ravine, in a stream, with a small trail petering out to the right and a steep hillside not-quite-trail petering out to the left. Just as we were concluding that none of our options could possibly be the trail, it started raining. Then the rain escalated. It poured. Like a lot. The hill we had come down to get to the river was quickly turning into a mudslide. We wondered whether we should wait for the rain to stop so the trail could get more traversable or if maybe the quality of the trail is less about how much it is raining and more about how much it has rained, and we should get out ASAP. I left Ariana at the bottom with our packs and my tractionless shoes and, barefoot, tried to go back the way we’d come.
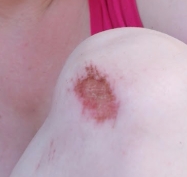
It was impossible for me to get up the steep mudhill. Imagine you’re on a nice hiking trail, and you’re glad there’s a trail there because the vegetation beside the trail is sufficiently dense that you definitely couldn’t walk through it. Now imagine that the trail is frictionless quicksand lava and the vegetation is your best option because at least it might give you something to grab on to. Remember, as you imagine, that you are soaking wet. Like, so wet you could submerge yourself and all your stuff and the muddy hillside and all its plants in the ocean, and it wouldn’t get any wetter, just saltier. So I hiked, by which I mean scrambled like a nature-destroying monkey pulling bushes out of the ground by their roots in an attempt to find something solid to put my weight on, out of the ravine. When I got to the top, I was covered in cuts and scratches. Like everywhere. I have no idea which plant decided to stab me in the top of my inner thigh, but I had cuts and scratches there, too. And still no idea where the trail was. I retraced our steps and found nothing. I didn’t know how far back we’d need to go to get back to the trail. We hadn’t seen any other hikers lately, but we desperately needed to consult with someone who knew where the trail was. I eventually found a path we hadn’t tried and went back for Ariana and our packs so we could try it.
The hill had only gotten muddier in this time, and we had no idea how to get her or our packs out of there. I was perched in a tree a few dozen yards above Ariana, scared to go back down the impossible-to-get-up mudslide hill. Ariana tried hiking a pack to me and just slid right back down the hill, scraping her knee. As we both sat, shouting to each other through the downpour and comically failing at our attempts to reassure ourselves or each other or collectively brainstorm a solution (why didn’t we bring rope?!), I heard a voice. A human!!! Now, in my normal life, I’m quite picky about humans. I like some of them, I don’t like others; I select rather carefully, especially when the stakes feel high. But in this moment, I quite literally screamed out through the pouring rain, “Hello! You’re a human! I’m so happy you’re here!!!” I hiked toward the voice, hoping they knew where the trail was.
When I got to the voice, I found three whole humans, but unfortunately, they were lost, too. Once they saw the impassable mudhill that looked like a trail, they were convinced, as we had been, that it was, in fact, the trail, and they were confused about why we thought we were lost. I tried to explain that the thing that looked like the trail didn’t continue, but they didn’t believe me. I suggested that they leave their packs at the top of the hill so at least they wouldn’t have to get the packs back up the mudhill, which as far as I could tell was impossible, but there was no dissuading them. By the time they explored the petering-out paths to their satisfaction and concluded, like us, that down the mudhill was not the way, five of us and all five packs were stuck in the ravine together. Big hiker dude hiked up the mudhill through, as far as I can tell, magic. His partner got out by literally belly crawling up through the mud; it looked both un-fun and unreliable. Their friend and I got out the way I had the first time, hacking our way through the underbrush. Ariana tried to follow us that way, but three previous escape routes had destroyed most of the good hand and foot holds. She got stuck on the side of the mountain, clinging to nothing with such little stability that she was sure if she moved at all she’d just tumble down and break herself. “Well, it’s been a good life.” She managed to communicate her stuck-ness to me, and I had a little faceoff with big hiker dude. One of us was going to go get my girlfriend, and he was clearly better suited for the job. He couldn’t quite see her; I pointed. “You’re clearly a better climber than me. If you’d be willing to go get her I’d be eternally grateful, but if not I’m gonna go see what I can do.” I put my pack down and made to head towards Ariana, and he decided to go. He was amazing. He saw her, went to her, used his feet as solid things for her to step on, and brought her back to me step by step. I love him forever. We all went back up the way they had come and found the trail again. Hallelujah.
So, the advice I have is don’t get lost. I honestly have no idea what we could have done differently to prevent this, except maybe stop at mile marker 8, have a snack, wait for someone who knows the trail to come by, and follow them to mile marker 9. I don’t know where we got lost because we arrived at the ravine from a different direction than they did, but where they got lost was at a tree. As you’re walking the ninth mile, there’s a tree in the path. On the tree, there’s a little etched arrow pointing left. To the left there’s a bunch of rocks you could climb up. It doesn’t look much like a path. Directly ahead of you the path continues. It’s a lie! Don’t go forward, go left up the rocks. Forward is a ravine death-trap of terrible. Good luck!
Pro-tip #3: Mud = Treachery
Kalalau is made of mud. Get out while it’s sunny if you can. Hard rain levels up the situation drastically. Hiking when it’s muddy is at least ten times harder than hiking when it’s dry. For us, days one and five were lovely and relatively mud-free. Days two and six were a slip-and-slide, and not the fun kind. (The drizzling was lovely though.)
Pro-tip #4: Don’t Hike in the Dark
Ok, obviously, we didn’t plan to hike in the dark. But the first day we were insufficiently mindful of time. We had a lovely hot breakfast at the ½ mile mark and a wonderful time at the beach two miles in and imagined we could hike the next four miles in four hours or less. We imagined wrong. My shoes had insufficient traction, and I stumbled and fell a few times as the sun got lower and we tried to hike faster. Once it was well and truly dark and we were hiking by the light of our headlamps, I stepped on what looked to me like ground with my right foot but the ground gave way and I slipped and my right leg fell off the mountain. It was dark, so I don’t know whether or not a tumble down that hill would have been a tumble to my death, but fortunately, I fell straight down onto the trail, skinning my left knee and injuring my left foot. We just stopped. We cleaned off my knee with water and then, excruciatingly, alcohol. I spread out my sarong on the trail and lay my head in Ariana’s lap and we looked at the stars. Physically, it was a hard moment, but relationally it was really lovely.
Lessons for us here? Be mindful of time. Calculate your rate of travel in the first few miles, and assume you’ll slow down as you go. It’s easy to get distracted by the beauty or the fun beach, but we were the slowest hikers on the trail, so fast miles took an hour, and slow miles took us 90 minutes. The mile between 8 and 9 (with the ravine adventure) took three hours.
Pro-tip #5: Share
Consider all resources shared resources, and all injuries shared injuries. When I skinned my knee because it was dark and my headlamp kind of sucked and my shoes didn’t have tread, that was as much a problem for Ariana as it was for me. Her ibuprofen got depleted too.
Pro-tip #6: Stick Together
We kept a line of sight with each other as we hiked, and that felt really important. We had the slower person go first, or the person in front pause every time she went around a bend to make sure the second person was still with her. If something happened to our partner on the trail we wanted to be able to get to them fast. We strongly advise committing to travel at the rate of the slowest member of your party. For serious, rushing on the Kalalau might actually kill you. Rushing someone else on the Kalalau may kill them. It’s not ok.
Pro-tip #7: Walk Mindfully
When I focused all of my attention on where to put my feet, walking went much better. Making sure a foot or a trekking pole was firmly attached to the ground at all times was really helpful. There’s breathtaking beauty around many of the bends. I enjoyed stopping to exclaim and look around, but walking while gaping didn’t go well.
Pro-tip #8: Talking is Hard
Don’t plan to converse. It may just not happen. This was the hardest part of this trip for us. Ours is a relationship filled with hours of deep meaningful intimate conversation, and when we were on the trail there just wasn’t any space for that. We’d love to find an amazing backpacking trip with a mostly flat trail wide enough for two to walk side-by-side and easy enough that we could walk and make sentences at the same time. This was not that trail. Just walking here takes a lot of concentration and is fairly effortful. It’s a technical experience, and it requires a lot of attention. Even in the two days in the middle when we didn’t hike, I was so busy healing and we were so far out of our element that finding our way to intimacy with each other was hard. I highly recommend this trip as an outdoor adventure, but not as, say, a honeymoon. At least, not for us.
Pro-tip #9: Talk to Strangers!
There are lovely other people on the trail, and we very much enjoyed talking with them. It’s also the only way we had to get vital information, like the weather report. Or to schedule ourselves incredible massages for when we got back to town.
Pro-tip #10: Beware Falling Rocks
")

The waterfall shower at Kalalau was my favorite of all the nature I saw on this trip. It is amazing. Also, there are brittle rocky cliffs overlooking it that drop rocks from high enough that they’re basically bullets. If there are goats up on the cliffs that happens more because the goats dislodge the rocks. Also, if it’s been raining, more rocks fall. We kept an eye out for goats above and timed our showers accordingly. Also, we were lucky.
The caves by the beach are a great place to stay dry, and a lovely place to camp, especially with a hammock. It is, however, a round of Russian roulette with the falling rocks every time you enter or leave them. If you choose this option, pray and run.
Pro-tip #11: Navigating Crawler’s Ledge My Fear
As it turned out, Crawler’s Ledge was not the part of the trail I found most dangerous. It’s made of rocks that mostly don’t move under your feet, and that’s incredibly helpful. That said, Crawler’s Ledge (and several other parts of the trail, just FYI) did involve spending some quality time one misstep from certain death. That was sufficiently focusing for me that I was fairly confident I wouldn’t misstep, so I was fine. The advice I’d give to anyone feeling nervous is to put your eyes and all of your attention on the eighteen inches of ground in front of your feet. There will always be a safe place there to put your trekking pole and your foot. Do that. Repeat.
(Did we mention trekking poles? We’re thinking of starting a side business selling trekking poles for $500 each right before Crawler’s Ledge. We think we’d make a killing. Hopefully not literally.)
Pro-tip #12: Train
I started weightlifting in June, figuring that three or four months of strength training would probably help me carry a heavy pack a bunch of miles. It almost certainly did; my thighs and butt and back were all fine. My calves had some things to say though. Specifically, “Ok, fine, you want us to be shorter? We can be shorter. Look. There. Shorter.” “What? Now you want us to stretch out again? What is with these mixed messages?!? You’re the worst!!!”


Also, my poor feet swelled up to the point where I couldn’t find my ankles. They reminded me of the humans on the floaty spaceship chairs from Wall-E. See the resemblance? My ankles eventually came back after we got off the trail, but it was scary there for a moment. Plus every muscle in my feet hated me.
Ariana hadn’t been weightlifting, but she runs on her elliptical for an hour every day, and that got her much better physically prepared for this trip than I was. In retrospect, I could have prepared for this hike by, for example, hiking. That would probably have been the best plan.
Annotated Packing List
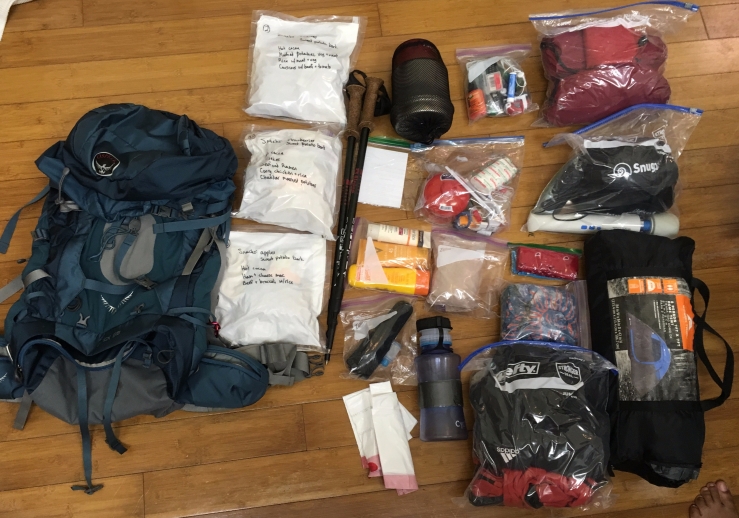
This is all the stuff I carried on day one. Here’s lots of details on how our gear worked for us, and Amazon affiliate links to both the things I was glad to have and the things I wish we’d had, so you can buy them if you want to. (If you buy them by clicking here, Amazon will put a little bit of money into my dehydrator fund!)
 Packs
Packs

I loved my pack, and Ariana loved 
We both bought our packs at REI, where lovely knowledgeable people helped us each fit them. We highly recommend trying on a bunch of packs and finding one that fits you well, and getting someone who knows about these things to help you with that process.
After you select a pack but before you part company with your knowledgeable friend or salesperson, put some weight in the pack, make all the straps slack, and tighten them back on yourself a bunch of times so you’re sure you can cinch it on good on your own. Don’t just get the straps in the right places and plan not to move them. As you add things to your pack, the weight and its distribution will shift and it’ll all need adjusting. Also, you may gain or lose weight during the hike. Both of us were surprised to discover that our normally stable body weights changed on this trip. If that happens, you’ll need to re-fit your pack to your new body. I adjusted mine every time I put it on. Ariana left all the straps set and just readjusted them after a few days when she noticed her pack fitting wrong. Both strategies worked fine.

 Ziplocs, Waterproofing, and What Goes Where

I have developed much stronger opinions about Ziploc bags that I ever imagined I’d have the occasion to.
Quart and gallon and two-gallon Ziploc freezer bags were our strategy for waterproofing and organizing all of our stuff. Everything in our packs was inside a Ziploc bag. The bags were organized by contents: one for the kitchen stuff, one for my clothes (Ariana had a dry bag for her clothes, which also worked well), one for the bed situation, one for stuff we hoped not to use (spare batteries, extra TP, phone charger), and one for stuff we used all the time (headlamp, bug spray, swiss army knife). Keeping stuff organized this way was really helpful. Each of us was responsible for different things, so we always knew which pack to look in: kitchen stuff in my pack, tent in Ariana’s, etc. Ziplocs for things we wanted close at hand (water purification stuff, sunscreen, bandanas) went in the top of our packs, Ziplocs of things we hoped not to use, things to use at camp, or food for later days were buried deep in our packs.
On the first day, our tent was strapped to my pack. By the end of the first day, when I had fallen 3 or 4 times, had a bloody knee and a sprained toe, and Ariana was basically fine, we moved the tent to her pack instead, which I really appreciated. If one of you is suffering more or less than others, move stuff between packs accordingly. Remember, all injuries are shared injuries. We met a guy who hiked two packs several miles after his dad’s knee gave out. Shared injuries is an abstract idea that has a way of getting super concrete on the trail.
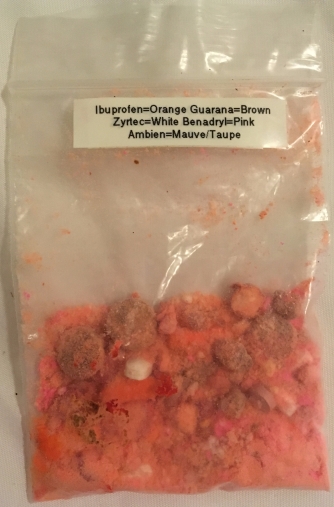 One important thing we learned is that “freezer bags” is code for “waterproof.” Before this trip, I thought all sealed plastic bags were more or less waterproof. I was wrong. Ariana found an adorable small solidly-zipping plastic bag. Perfect for pills! She made a legend so we could know which pill was which by color. Brilliant! Unfortunately, this is what our pills looked like after the rain. A caffeinated Benadryl/Ambien/Ibuprofen powdered cocktail. Moral of the story: use Ziploc freezer bags. Sandwich or snack bags aren’t waterproof. Honestly, a freezer bag with a hole in it is more waterproof than a sandwich bag. Also, while you’re at it, don’t get the kind with the little plastic zipper pulls. They come off and then the bags are hard to open and close. Just get ones you can seal and unseal with your hands.
Whatever your waterproofing choices, my advice is to wear your full pack into the shower before you go. If you don’t want to, it’s not waterproof enough.
Trekking Poles
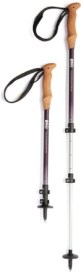 Before this trip, I had never used trekking poles. On this trip, I vowed to never again leave my house without them.
As we were collecting opinions from the internet about what to bring, opinions on trekking poles were sharply divided. Lots of people said they were essential, and lots of other people said they were wasted weight. I won’t say they were essential; without them I would have been fine, primarily because I never would have made it far enough to fall off the mountain and die, I would’ve just sprained an ankle in the first few miles and gotten a helicopter ride out. Seriously, my trekking poles saved me dozens of times. We used them the whole time, and they were amazing.
If you’re concerned about the weight of the trekking poles, here’s how I recommend calculating it. Put a bathroom scale on the floor with a small stool next to it. Put on your full pack and stand on the stool with your trekking poles in hand. Put the ends of the trekking poles on the scale and lean into the poles with as much weight as you can. Subtract the scale reading from the weight of your poles to get the effective weight of the poles while you’re hiking. (Yes, this will be a negative number.) The weight that the poles hold up is quite literally weight off your knees. Take trekking poles.
If, like us, you’ve never used trekking poles before, read about how to use them before you go. We were glad we knew to shorten our poles when going uphill and lengthen them for downhill, and we were really glad to have poles with good pointy tips! (My poles had so much more traction than my feet, it was amazing.)
When going uphill, my poles saved my quads. Downhill, they saved my knees. On the flat parts, which there were a couple of, they just propelled me forward, which was awesome. In the mud, they saved my life. I am forever grateful to my other sweetie who loaned me their trekking poles and to my friend who talked me into bringing them. Sometimes it takes a village.
Hiking Shoes


I wore Chacos. I don’t recommend them. I got them because they didn’t annoy my ankles, and they gave my toes room to spread, and I was happy for those things. There wasn’t enough strap on them so I stole some webbing from my backpack and sewed it into the shoes, and that was super helpful, especially when my feet swelled. But I was so busy thinking about how my feet connected to my shoes that I forgot to think about how the shoes would connect to the ground, and that turned out to be a serious problem. 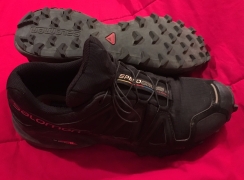 Traction matters!
Ariana had trail runners, which were infinitely better than what I had. The wide-spaced knobby bits on the bottom kept her from slipping, and that was really helpful.
Here’s my hiking shoe advice: imagine you will be racing up a mud-covered hill that is melting under your feet, there is nothing to grab with your hands, and if you don’t make it you’ll die. What shoes do you want to be wearing? Wear those.

Food!
We relied entirely on Chef Glenn at backpackingchef.com for our food system. We bought his book, borrowed two dehydrators, and ran them for a week to make all the food for our trip. It was delicious. (Ok, the ones we borrowed weren’t as awesome as the one I just linked, but that’s the one I’d buy if I was going to buy one. If I had, the ham wouldn’t have turned out as tough as it did, and everything else would’ve been easier. I might buy it. Dehydrating things feels like a new superpower.)
Ariana doesn’t much like breakfast food, and we’re both reasonably hungry people, so we decided to make three hot meals a day, with large portions. This worked out great; we were happy to stop and enjoy food often, and we certainly needed all the calories we brought.

Most of what Chef Glenn suggested was perfect. Here are the alterations we recommend:
- He says you can make little baggies by cutting and taping ziploc snack bags. That didn’t work for us; the tape didn’t stick and powder got everywhere. Next time we’ll try something else.
- The book went into great detail about how to dehydrate almost all of the ingredients in our meals except for the pasta. To save time and fuel on the trail, fully cook and then dehydrate the pasta. We did that with macaroni and it worked great.
- Keeping things from going bad involves taking almost all the fat out of the food. We missed fat a lot. If we had it to do over again, we’d bring some butter powder and make it part of every meal. I don’t know what butter powder is either, but this farm’s cheddar cheese powder is so good I’m inclined to trust them.
Kitchen
The TSA allows camping stoves in checked baggage as long as there’s no fuel. Hawaiian Airlines doesn’t, so we waited until we got there and then bought one at ACE hardware. We flew it back with us just fine by simply not mentioning it. If I had it to do over again I’d get a stove at home and bring it, so I could get a super light one I like and not have to spend time shopping for a stove when I could be at the beach in Hawai’i.

The fuel we got was great. We brought two canisters but only used one. (It was pretty light by the end of 6 days, I was happy to have the second for peace of mind.)
We brought several lighters and kept them in different ziplocs, which turned out to be a great plan. When our little baggie of salt exploded all over our kitchen bag our lighter stopped working. We were very happy to have an extra in a different bag that wasn’t full of all our salt.

I have a camping cookset that I like, but it was only barely big enough for the meal we tried at home, so we got this one instead. The pan requires that its handle be squeezed with purpose whenever its picked up so as not to flop all the food into your lap, and the handles got hot when cooking, and one time when I used my bandana as an oven mitt I accidentally set it on fire, but the pot and pan both worked great, it was light, and it was easy to store the stove and our sporks in it.

 Headlamp
We highly recommend a super-bright headlamp for each person. You’ll try hard not to hike in the dark, but you can’t control weather, and you might get lost or stuck, and if it’s dark you’ll need to illuminate the trail but good. Bring extra batteries; even if you know they won’t run out, they could still explode.

Ariana’s headlamp was the Petzl Tikkina, and it was super bright and awesome. My headlamp was less awesome, and as a result I fell off the trail while we were hiking at night, injured my big toe joint, and skinned my knee. I have a new appreciation for the eight-year-olds running around with skinned knees. It hurts a lot!
Bandages
Band-aids are insufficient for a skinned knee. We used paper towels and duct tape. It was suboptimal. We wished we’d had liquid bandage with us. We had
alcohol to disinfect. It was good for hand-rinsing, but on my skinned knee it hurt so much! Antiseptic that is less awful to use would’ve been really helpful.


 Camera

Ariana brought her amazing dSLR camera, and we were super happy to have it. We took hundreds of pictures and I got to learn a bit about photography. It was really a wonderful toy to have with us. She also brought her 
Next time, we’d bring an extra memory card for the camera. The one she had had plenty of room on it, but we had a scare the first time we tried to use it when the camera couldn’t format it properly and for a moment we thought we wouldn’t be able to take any pictures. An extra memory card is light to carry.
(Unrelated to cameras, I brought one thing that was a bit too heavy to make sense but that I was glad to have. I’d do it again.)
Emergency Objects
We had one whistle (built into the chest strap of my pack) and one signaling mirror. Fortunately we didn’t need them, but if I had it to do over again we’d make sure each pack had both of those, in case we got separated or a person and/or their pack were somehow inaccessible, like at the bottom of a mudslide or down a ravine.
Bathroom Accoutrements
Before we went, we did a lot of research about how to meet one’s bathroom needs while backpacking. We brought this trowel, and I would bring it again, but we never wound up using it. There are bathrooms at Hanakoa (the campground 6 miles in) and at Kalalau (and also two miles in at Hanakapai’ai Beach) and we were lucky enough to do all of our pooping in the mornings before we started hiking, so those worked for us. We did bring our own toilet paper, and we were very happy to have it. We brought some camp-store TP which was had no absorbent qualities whatsoever, and also a regular roll from Ariana’s bathroom with the cardboard tube pulled out of it, which was much better.

 Bug Repellant


Deet. and anti-itch stuff. Both. Don’t underestimate the power of mosquitos to make your life miserable. Don’t take eco-friendly bullshit bug spray that doesn’t work, take a little orange bottle of poison. We did that, and it was effective. We wound up with many dozens of mosquito bites instead of many hundreds. That difference mattered.

 Wet Wipes

Wet wipes weren’t essential but they were really really nice to have. After we succumbed to deet use, it was really important to be able to wipe our hands before eating or touching things without deet-ing a river.

 Sleeping

We thought long and hard about our sleeping situation. I have a pair of Big Agnes sleeping pads that are a bit of an annoyance to blow up, but quite light to carry and comfortable to sleep on, so we brought those. I was all ready to bring my awesome zip-together sleeping bags but Ariana (who is often right, including in this case) thought those would be too warm and unnecessarily heavy. So, we bought a jungle blanket and fell in love with it. It was awesome. We slept under it at the airport when our flight got delayed and on the plane and now, because I’m a great girlfriend, it gets to live with Ariana, who can use it whenever she wants. It was light and bizarrely warm, given how light it was. I think it’s made of magic. To be honest, it was too warm for the Na Pali coast in early October, but we loved it so much we didn’t care.

 Camp Shoes

We read before we went that we should bring flip-flops or some such footwear to wear at camp while not hiking. Extra shoes seemed silly so we didn’t bring any, and we regretted it. It turns out that easy shoes for at camp that aren’t what you hiked in are more important than we thought. Light and flimsy would’ve been fine, just something to keep our feet from stepping in mud.
Pills
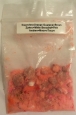 Bring whatever pills you might need, and for goddess’ sake, waterproof them! And keep different kinds of pills separate from each other. This mix of powdery substances started out as pills in a bag in a bag in a bag and ended up useless.

We did not bring enough ibuprofen and that was silly. We recommend enough ibuprofen for your whole party to be on an anti-inflammatory dose the whole time. Yes, it’s a lot, but you don’t want to be rationing the ibuprofen on the trail.
Clothes
“Quick-drying” is a misleading term. It implies that the difference between quick-drying and not quick-drying is about speed: how fast the thing will dry. On the trail, we discovered that “quick-drying” basically just means “drying.” Once wet, a quick-drying thing could someday be dry again. For anything that’s not labeled quick-drying, dry to wet was, for all practical purposes, a one-way situation.
 All of the times when some fancy outdoorsy people said we should buy the fancy blah-de-blah and we were like, “Really? A $40 shirt? For serious?” Yes. The answer is yes. The one of us who bought the things (Ariana) was happy to have them, and the one who didn’t (me) was jealous. And wet. Forever. If you’re a novice backpacker, people who have done this more than you made clothes to solve problems you don’t yet know you’ll have. Reap the fruits of their labor. Quick-drying and wicking socks and underwear and shirts and pants.

Instead, I brought a pair of sweatpants so I could be warm at night. That was dumb. It wasn’t remotely cold enough to wear them while hiking, and I accidentally stepped into a river with my sweatpants on on my way to the bathroom the first night, and then they were wet, so I hung the leg out of my pack to dry, and then it rained, and then they were soaked, and they took days to get dry again, and I never again used them. Don’t bring sweatpants.
towel and a
poncho when she got chilly and found that totally sufficient. Also, the poncho doubled as a lovely tarp!

Ariana had some little wool socks that she was really happy with.

light wool tank top and a light long-sleeved shirt. We met some experienced hikers who took this approach, and it seemed like a good one.
The main take-home was that cotton stayed wet forever. Rain was abundant. Lots of people said don’t bring anything made of cotton, and they were right. People make magic with plastic. Wear plastic. It doesn’t sound comfortable, but it’s way better than wet cold heavy abrasive chafing cotton.
Water


I brought my platypus and Ariana brought her
camelbak and both worked great.

steri-pen, and were really happy with it. It’s basically magic, and it worked! We didn’t get sick even once!
(Remember extra lithium batteries, and to pack them in your carry-on.)
Other Essentials

campsuds would’ve been plenty.

Bandanas were everything! Body cloth, headband, personal cooling system, dish sponge, towel, oven mitt (pro-tip: don’t light your bandana on fire while you’re cooking), seat cover, rope, potential signaling flag, device to put between skin and mosquitos, and sweat mop, to name a few. Bring bandanas. They’re amazingly versatile.

Little carabiners are how you attach things to other things. Bring a handful.

Ariana brought a hat. She used it to keep rain out of her face, and I used it to keep sun off of mine. Because of our very different hat needs, one hat for two people worked great!
Duct tape! We wrapped a bunch of duct tape around our water bottle and used it for general repair and as a bandage/shield for my skinned knee. It was invaluable. Bring duct tape.


twisty clothesline which was awesome. We were envious.


green scratchy surface part of a sponge. I was content with a bandana for dishes, but you can guess whose job it was to do the dishes after the meal I burned to the pot.
Last, but certainly not least, we recommend deodorant. Good goddess. I don’t usually wear deodorant in my regular life, but for a while on the trail I didn’t want to breathe near my armpits, and that was challenging. While deoderant wasn’t sufficient for me, I was very glad not to be without it. Ariana used it more than once a day, and it was sufficient for her.

Getting Back to Town
When you return, we recommend booking accommodations with (1) a bathtub, (2) a washer and dryer, and (3) a large sunny or covered space to dry things. We booked a place near the trailhead, and while it had a real bed and hot water that came right out of the walls and that felt like nothing short of a miracle, I wanted a soak and I wanted my things to get clean and dry and none of that really happened. I wouldn’t have minded driving around the island to get to a sleep spot, and I think the leeward side of the island would have been sunnier, even though that’s far from the trailhead.
We planned several days in Kauai between hiking and flying home, and those were essential. We originally planned to use them for touristing, but wound up needing them for recovery, debriefing, and relationship repair. Another week would have been even better, but I was very glad we had the space to be gentle with ourselves, our bodies, and each other, and to eat our weight in poke and shave ice.

What about your tent?
LikeLike
Our tent was great. 5 pounds, $5. Bought it on impulse last year at a sidewalk sale near my house. It leaked a little when it rained a lot, but not too much. I left it out of this discussion because “find a great backpacking tent at a sidewalk sale and buy it for $5” isn’t a reliably replicable plan.
LikeLike
Thanks for all of this information!! We long to do this hike – it’s on our bucket list. FYI – powdered butter is called Butter Buds. We can buy it at our local grocery and I’m sure Amazon likely carries it as well. 🙂
LikeLike
Thanks for sharing your Kalalau experience. I am putting this back on my bucket list for next year in August. I say “putting it back” because two years ago, I chickened out after getting permit, training, etc. after reading about the crawler’s ledge. I have height issues but depending on who describes their experience, I should be able to do it. I guess, there’s only one way to find out….JUST DO IT!
I will be doing this with a group of friends who are giving me moral support.
LikeLike
Novice or expert this is a fantastic blog with lots of great advice. I came to Kauai in 1995 for the specific reason to hike Kalalau and the island stole my heart. Came back many times after that and hiked Kalalau several times over the years. Moved here full time in 2004 after retiring and now kayak in couple times every summer staying 5 nights each time. Already have permits for next year. I turn 70 next month and K still draws me back all the time. Thanks so much for your great insight for those who hike the trail.
LikeLike
Stellar info and advice! I’m doing this hike with my husband in April and we’ve never backpacked before – this was super helpful. Thank you for linking to everything too 🙂
LikeLike
[…] I tried seeing my chiropractor every few days for months. I tried avoiding men entirely. I tried living outdoors in tropical nature with no access to electricity. I tried going on a meditation retreat. I tried reiki. I tried going to the premier headache center […]
LikeLike
Thanks for all the great advice! Hope to hike the trail in November. I don’t have much overnight camping experience, so these tips are much appreciated. Gotta get my butt in shape by then, too. Wish me luck!
LikeLike
Good luck! Make sure you get some more recent advice than this – there’s been a major landslide and several years of trail closure since I went. I think the trail is less passable now.
LikeLike